


หลักๆ ก็จะมี code อยู่ 2 ไฟล์ ไฟล์แรก
- “process_image.py” เป็นไฟล์ api program
- “test_call.py” เป็นไฟล์เอาไว้เทส เรียก api ไปที่ process_image.py ด้วย http request (URL : http://127.0.0.1:5000/process_image)
process_image.py
import numpy as np
from flask import Flask, request, jsonify
import easyocr
import cv2
from PIL import Image, ImageFont, ImageDraw
import io
import base64

app = Flask(__name__)

# OCR ภาษาไทย + อังกฤษ
reader = easyocr.Reader(['th', 'en'])

# ฟังก์ชันในการแปลง Base64 เป็นภาพ
def base64_to_image(base64_str):
    img_data = base64.b64decode(base64_str)
    img = Image.open(io.BytesIO(img_data))
    return np.array(img)

# ฟังก์ชันในการประมวลผลภาพ
def process_image(image):
    image_rgb = cv2.cvtColor(image, cv2.COLOR_BGR2RGB)

    # OCR บนภาพทั้งหมด
    results = reader.readtext(image)

    # แปลง OpenCV เป็น PIL เพื่อเขียนข้อความภาษาไทย
    image_pil = Image.fromarray(image_rgb)
    draw = ImageDraw.Draw(image_pil)

    # โหลดฟอนต์ภาษาไทย
    font_path = "content/Sarabun-Thin.ttf"  # ต้องอัปโหลดฟอนต์ .ttf ก่อน
    font = ImageFont.truetype(font_path, 32)

    # วาดกรอบและแสดงข้อความสำหรับป้ายทะเบียน
    for (bbox, text, prob) in results:
        (top_left, top_right, bottom_right, bottom_left) = bbox
        top_left = tuple(map(int, top_left))
        bottom_right = tuple(map(int, bottom_right))
        draw.rectangle([top_left, bottom_right], outline='green', width=2)
        draw.text(top_left, text, font=font, fill=(255, 0, 0))

    # ตรวจจับชื่อจังหวัด โดยตัดส่วนล่างของป้าย
    h, w = image.shape[:2]
    province_region = image[int(h*0.6):h, 0:w]  # ตัดส่วนล่าง 40% ของภาพ

    # OCR เฉพาะส่วนที่ตัด (ชื่อจังหวัด)
    province_results = reader.readtext(province_region)

    # วาดกรอบและแสดงข้อความสำหรับชื่อจังหวัด
    for (bbox, text, prob) in province_results:
        (top_left, top_right, bottom_right, bottom_left) = bbox
        top_left = tuple(map(int, top_left))
        bottom_right = tuple(map(int, bottom_right))
        draw.rectangle([top_left, bottom_right], outline='blue', width=2)
        draw.text(top_left, text, font=font, fill=(0, 0, 255))

    # แปลงภาพกลับเป็น base64
    buffered = io.BytesIO()
    image_pil.save(buffered, format="JPEG")
    img_base64 = base64.b64encode(buffered.getvalue()).decode("utf-8")

    return img_base64, results, province_results

# API Endpoint สำหรับรับภาพ Base64
@app.route('/process_image', methods=['POST'])
def process_image_api():
    data = request.get_json()
    if 'image' not in data:
        return jsonify({'error': 'No image provided'}), 400

    # รับข้อมูล Base64 จาก request
    image_base64 = data['image']

    # แปลง Base64 เป็นภาพ
    image = base64_to_image(image_base64)

    # ประมวลผลภาพ
    processed_image, plate_results, province_results = process_image(image)

    # แปลงค่าจาก numpy.int32 เป็น int
    plate_results = [int(x[1]) if isinstance(x[1], np.int32) else x[1] for x in plate_results]
    province_results = [int(x[1]) if isinstance(x[1], np.int32) else x[1] for x in province_results]

    # ส่งค่าผ่าน jsonify
    return jsonify({
        # 'processed_image': processed_image,  # ส่งภาพที่ประมวลผลกลับใน Base64
        'plate_results': plate_results,      # ผลลัพธ์ของป้ายทะเบียน
        'province_results': province_results # ผลลัพธ์ของชื่อจังหวัด
    })

if __name__ == '__main__':
    app.run(debug=True)
test_call.py
import requests
import base64

# อ่านไฟล์รูปภาพและแปลงเป็น Base64
with open('img_test/1411832192-2014092407-o.jpg', 'rb') as img_file:
    img_base64 = base64.b64encode(img_file.read()).decode('utf-8')

# ส่ง POST request ไปยัง API
response = requests.post('http://127.0.0.1:5000/process_image', json={'image': img_base64})

# ตรวจสอบผลลัพธ์
print(response.json())
ติดตั้ง module จำเป็นที่ code program เรียกใช้ ด้วยคำสั่ง :
pip install opencv-python-headless easyocr matplotlib flask
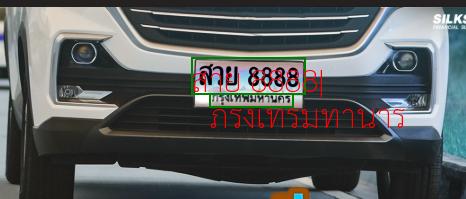
ตัวอย่างผลลัพท์ที่ได้จาก API response จะมี 3 คีย์ให้เลือกใช้งาน
'processed_image'  # ส่งภาพที่ประมวลผลกลับใน Base64
'plate_results'    # ผลลัพธ์ของป้ายทะเบียน
'province_results' # ผลลัพธ์ของชื่อจังหวัด

หมายเหตุ: โค้ดชุดนี้จัดทำขึ้นเพื่อเป็นแนวทางสำหรับผู้ที่ต้องการศึกษา โดยโค้ดชุดนี้ยังมีบางส่วนที่ต้องการการพัฒนาต่อเพิ่มเติมเพื่อให้เหมาะสมกับการใช้งานของผู้ดาวน์โหลด
![]()